About Kate
Kate grew up in North Wales and originally studied costume at the Royal Welsh College of Music and Drama in Cardiff before graduating in 2001 with a BA Hons in Theatre Design. Following this she worked as a freelance costume maker at Glyndebourne Festival Opera and then as part of the Touring Wardrobe department at the Welsh National Opera. Kate has always loved hand embroidery, and got the stitching bug from her Nan at an early age, so in 2013 she decided to take the plunge and re-train as an embroidery tutor at the Royal School of Needlework (RSN) at Hampton Court Palace.
Kate graduated from the Future Tutors Programme at the RSN with distinction in 2016. During the course she studied many traditional hand embroidery techniques including goldwork, Jacobean crewel work, blackwork, stumpwork and silk shading. In 2015 Kates Advanced Silk Shaded budgie “Smuggler” was accepted by the Royal Academy of Arts for their annual Summer Exhibition. The piece was also made into a greetings card.
Kate loves to design her own embroidery kits, using traditional techniques in a contemporary way. She also likes to combine her embroidery with her love of historical dress, creating kits based on original pieces. Her classes can cover all levels of ability, from absolute beginners to more advanced stitchers. When she’s not involved in freelance projects Kate works as a stitcher for the RSN in their commercial studio, working on conservation, restoration and private commissions.
Kate has taught for the Royal School of Needlework at Hampton Court Palace, RSN Bristol, Bath Fashion Museum, Williamsburg School of Needlework in the U.S., and the RSN 2018 Summer School in Lexington, Kentucky. She also teaches for The Craft Sanctuary, Needlework Tours and Cruises, The Alpine Experience, Crewelwork Company, and justhands-on.tv !
In 2018 Kate was runner up in The National Needlecraft Awards 2019 Embroidery Designer of the Year category.
Signature Technique
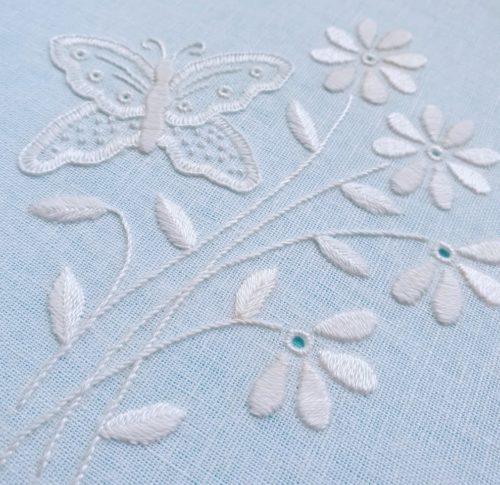
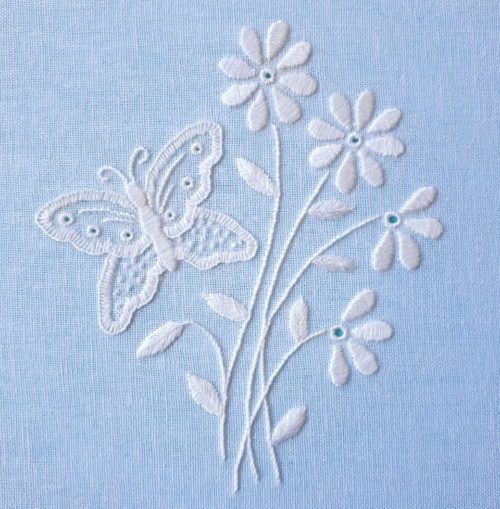
Silk Shading
Top Tips
- You invest a lot of time and love in your stitching so always buy the best quality materials and equipment you can afford. This will give you better results and will create pieces that will last and hopefully become heirlooms!
- To help stop your threads from becoming knotted and tangled, work with a fairly short length in the needle. About 30cm is a good length and it will also help to maintain the condition of the thread.
- Don’t be afraid to have a go! Even the best stitchers get very good at unpicking! One of the nice things about hand embroidery is that you can take things out if you’re not 100% happy.
- Use traditional techniques in a contemporary way to create beautiful textile art.
- Practise, practise, practise. I know it’s a bit of a cliche but every has to start somewhere are the more you stitch the better you get.
- Don’t underestimate the healing effects of hand sewing. Your projects don’t need to be complicated, even simple stitching can bring great pleasure and calm.
Videos


Posts
How do you cut the strips for Log Cabin?
This is the question from Janice: like you I just love the look of the log cabin and am about tho venture down this road. Can you tell me - is the strips cut on the bias or just straight across? Here is our answer:
ALWAYS assume that strips are cut ACROSS your fabric unless you are told otherwise - when you cut down the grain is very unforgiving and when you cut on the bias your quilt will wave!!!
Comments About our Films on Youtube
3 Comments from Youtube July 2013: Comment on How to pull the machine thread up through your work with Valerie Nesbitt From across the pond again, North Carolina, USA, I am thoroughly enjoying AND learning from these tutorials. LOVE the variety of subjects, especially the projects and the techniques incorporated into it. Also enjoy the interviews and off site shows.
What to watch here during August 2013
There are five Fridays in this month – so lots to view – and we start off by continuing to wander round the Textiles in Focus (2013) exhibition where we meet up with Lynda Monk who demonstrates how she used Lutradur and puff paint; and Jean Wright who is also demonstrating – but this time her love is goldwork; we also enjoy more of the Fen Edge Textiles exhibition that was on display.